Categories
How To Powershell Tech

Error Trapping in Powershell With a Windows Popup

If you’re old school like me and you write Powershell scripts using ISE or Notepad++, it gets a little tricky to troubleshoot issues with your scripts when you are dealing with many variables.

When I’m writing long complicated scripts, I like to put some useful error trapping in to show me where my script is failing and why. In this blog I will show you the basics of error trapping and then show how to make a popup window that will show the error message and the variables that were used at a particular point in your script’s execution.

Let’s say you have a script with some variables and you are trying to do some mathematical operations on those variables:

$VARIABLE1 = 10
$VARIABLE2 = 0

$RESULT = $VARIABLE1 / $VARIABLE2

Write-host $RESULT 

It’s pretty obvious in this simple script why you are getting an error, the variable you are trying to divide by has a value of zero. Dividing by zero is not defined in mathematics, so it errors out.

This is helpful if you are running your script in ISE, but if you’re running the stand-alone .ps1 file on a server, it’s going to open a command window, error out and close before you can see what’s going on. You could put a Read-Host command at the end of the script to keep the command window open until you press enter on the keyboard. This will at least give you time to read the error message before the window closes.

Simple scripts like this are very easy to troubleshoot, but let’s say you have a bunch of variables that you are doing operations on and the final result of those is causing your script to error out. Powershell isn’t going to give you much useful information in that case and you’ll have to mine it out the information you need yourself.

I like to use the Try{…}Catch{…} feature of Powershell along with a Windows Popup to capture the error and variables and present them to me in a GUI popup window.

The Try{…}Catch{…} feature in Powershell is much like other coding languages, it lets you wrap your code in a Try statement, and then “Catch” the error information generated, assuming there is an error.

The general form is this:

Try{
	
Some Powershell code

}Catch{"Do something if there is an error"}  

The errors are caught in a field called $_.Exception.Message which you can output to the console with a write-host command or to a popup window. If you leave the Catch statement blank it will capture the error, but it won’t do anything with it, so you will not see any error output.

I like to put a windows Message box in the Catch Statement which will show me the error message and the variables used that caused the message. You can do this with the [System.Windows.MessageBox]::Show command.

Here’s an example:

Try{

  $VARIABLE1 = 10
  $VARIABLE2 = 0

  $RESULT = $VARIABLE1 / $VARIABLE2

   }Catch{[System.Windows.MessageBox]:: Show($_.Exception.Message +"  VARIABLE1 = " +  $VARIABLE1 + "  VARIABLE2 = " + $VARIABLE2 +  "  RESULT = " + $RESULT) }

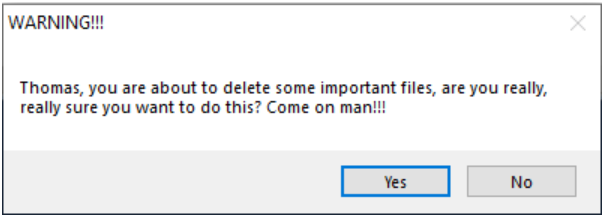
If you run this, it will pop up a window with the error message and the variable values at that point in the script:

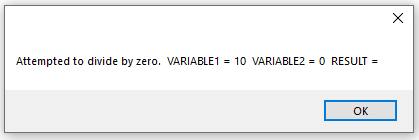
Be sure to leave plenty of space around your output text “  VARIABLE1 =  “ so Windows doesn’t cram all the words together in the popup.

This error trapping method is helpful when are trying to troubleshoot a long script and you aren’t sure what values your variables are getting at a particular point in the script. Obviously, you could also output the information to a file or do a write-host to output the info to the command window, but I like this method because it’s quick and clean and once you are done troubleshooting the script and ready to deploy it, you can modify the message so that it will continue to trap errors and show users any error message that a particular part of the script is generating. This is useful if you are writing the script for other users to run and you are unable to anticipate every scenario that will arise.

One thing I should point out about the Try{…}Catch{..} command, it’s only useful if it’s put in strategic points in your script. You could put the Try at the beginning of your script and the Catch at the very end, but it’s probably not going to give you much useful information in a very long script, especially if your script is capable of generating multiple errors.

In a later blog I’ll show you how to put the line number of the error in your popup for better troubleshooting.

Categories
Citrix How To Tech

Group Policies not being applied to a Citrix VDA workstation

If you open up Citrix Director and notice the Policies tab under Session Details for a particular VDA workstation is blank or shows n/a, it means that either you have no policies defined for that particular user or workstation, or Group Policies are not processing properly.

This is usually caused by a corrupt Registry.pol file on the workstation. Log into the workstation in question as Administrator, locate the Registry.pol file (usually in C:\windows\System32\GroupPolicy\Machine) and delete it. Then open up a Command Prompt and type in “gpupdate /force” and hit enter. This will force an immediate update of the policies.

If the policies for the workstation are defined in the Citrix Group Policy console, you will need to locate these folders and delete all files and folders underneath:

C:\ProgramData\Citrix\GroupPolicy
C:\ProgramData\CitrixCseCache
C:\Windows\System32\GroupPolicy\Machine\Citrix\GroupPolicy
C:\Windows\System32\GroupPolicy\User\Citrix\GroupPolicy

Reboot Workstation.

Categories
Citrix How To Tech

Troubleshooting Citrix ADC (Netscaler) Gateway login Issues

To troubleshoot authentication with aaad.debug module, complete the following procedure:

  1. Connect to Citrix ADC (NetScaler) Gateway command line interface with a Secure Shell (SSH) client such as PuTTY.
  2. Run the following command to switch to the shell prompt:
    shell
  3. Run the following command to change to the /tmp directory:
    cd /tmp
  4. Run the following command to start the debugging process:
    cat aaad.debug
  5. Perform the authentication process that requires troubleshooting, such as a user logon attempt.
  6. Monitor the output of the cat aaad.debug command to interpret and troubleshoot the authentication process.
Citrix ADC (Netscaler) Troubleshooting Gateway Login Issues

7. Stop the debugging process by pressing Ctrl+Z.

Run the following command to record the output of aaad.debug to a file:
cat aaad.debug | tee /var/tmp/<debuglogname>
Where /var/tmp is the required directory path and <debuglogname.log> is the required log name.


The output usually gives you a pretty good idea of what is going on. In this particular screenshot, I had a user who was trying to use the Citrix ADC change password feature. The output states that the first and second passwords do not match. I later discovered that Citrix ADC doesn’t do a validation check on the passwords, for matching or for complexity, so the user can put in different passwords or a password that doesn’t meet the environment’s complexity requirements and it will simply silently fail.

Categories
How To Powershell Tech

Backup and clear all Windows Event Logs using Powershell

Whenever I’m building a new server, PC or Windows VM, I like to clear all the event logs before turning it over to the end users. This way if any issues occur, I’m not trying to filter through thousands of useless event logs that occurred during the build process. There are a myriad of event logs to pour over now days in the Windows Event Viewer. There are your standard Windows Logs, App, Security, Setup, System:

Then there are the Applications and Services Logs:

There are the Microsoft Logs, Hardware Event logs and it goes on. If you want to quickly backup and clear all the logs, unfortunately the event log GUI doesn’t give you an easy way to do this. I wrote this Powershell script to accomplish this task in one fell swoop.  

$LOGS = wevtutil el
$PATH = Test-path C:\backup
if ($PATH -eq $false)
{
    New-Item -Path c:\backup -ItemType directory
}

Foreach($LOG in $LOGS)
{
           
    wevtutil epl $log c:\backup\$log.evtx
    
    wevtutil cl $log     
    
} 

The script will create a backup folder on the C:\ drive if it doesn’t exist (change this path to suit your needs). It will then enumerate all the Event Logs, back each one up to the backup folder and then clear it before moving on to the next log.

Before:

After running script:

The events that are 68KB are the empty ones.

There are a few caveats to running this. One, you will see errors when you run this script, it will try to enumerate logs that don’t exist. Because wevtutil is not a native Powershell command, there is no error suppression available. And Try{} Catch{} won’t work either. Just ignore the errors. Another thing to keep in mind, it will backup logs whether they have data or not. You could probably add some query logic to only backup logs that have data, but you’re probably never going to use these logs anyway. At least you can tell your boss you backed them all up before you deleted them.

Categories
Citrix How To

Publishing Windows Explorer in Citrix Virtual Apps

One of the first things users ask for when being migrated to Citrix Virtual Apps, is where is Windows Explorer? In this post I will show how to setup Windows Explorer in Citrix Virtual Apps. Depending on your companies security policies, you may or may not want users having the ability to launch Windows Explorer from a Citrix Server on the corporate network. Check with your security department before deploying this.

In Citrix Studio click on Delivery Groups:

Find the delivery group you wish to add the application to and right-click, go to Add Applications:

Click Next past the Intro screen if you see and get to the Applications screen. Click the down arrow on the Add button and select Manually…

In the Path to the executable file: field, type in %SystemDrive%\windows\explorer.exe (Note: depending on how you have your system setup, you may not get away with using variables in the path, you may need to put the absolute path in this field such as c:\windows\explorer.exe.)

In the Command line argument (optional): field, put the path to the folder you wish Windows Explorer to open to initially. The example I give opens the window on the user’s home directory: \\fileserver\userdata\%Username%
In the name fields, give the application whatever name you like. The Application name (for user): field will be the name that shows up on the icon in Storefront.

Click Ok > Next and Finish
When the user logs into Storefront they will see this icon:

Note: if you have an issue where Windows Explorer starts to launch, but then shuts down, you may need to adjust the LogoffCheckerStartupDelayInSeconds registry setting on VDA you are publishing from:

HKEY_LOCAL_MACHINE\SYSTEM\CurrentControlSet\Control\Citrix\wfshell\TWI

Value Name: LogoffCheckerStartupDelayInSeconds

Type: REG_DWORD (increase decimal value, I increased mine to 258)

Categories
Citrix How To Powershell Tech

Configuring RDS Licensing on a Client Machine

This article shows how to configure a client machine to point to specific Remote Desktop Licensing servers. A client machine will need to access an Remote Desktop Services (RDS) license server if it brokering more than two remote connections at a time. This includes Citrix Virtual Apps (formerly known as Xenapp) as Citrix connections also require a RDS license for remote connections.

First off this can and should be done through Active Directory Group Policy. The example I show below uses the local group policy editor, but the settings are the same whether you are using an AD GPO or local GPO.

Open up the Local Group Policy Editor.
Go to Start Run > gpedit.msc
Navigate to Computer Configuration\Administrative Templates\Windows Components\Remote Desktop Services\Licensing.

There are two settings that must be configured:
1: Use the specified Remote Desktop license servers
2: Set the Remote Desktop Licensing Mode

Open up the first one “Use the specified Remote Desktop license servers”

Check the Radio Button next to “Enabled” then input one or more license servers into the field “License servers to use:” Although not necessary, it’s best to put the FQDN for the server(s). Separate the server names by commas if using more than one. (Note: don’t worry about every license server having the particular OS version of license you need. The system will check each license server in the list until it finds the proper license. It’s best to put all the license servers in your environment into the list as administrators will most likely be updating the license servers over time.)

Click Ok when finished and open up the second setting “Set the Remote Desktop Licensing Mode”Check the Radio Button next to “Enabled” and then choose the license type from the dropdown. If you don’t know which license type to use, check with the person who administers the license servers.

Click Ok.

Now open up a command prompt as administrator and type gpupdate /force to update the policies.

If you are configuring this through Active Directory GPO, then you would link the GPO to the OU in Active Directory where the particular machine account of the machine needing licenses lives.

Categories
How To Powershell Tech

Add a “Are You Sure” popup to your Powershell scripts

In a previous post “Customize the output of Powershell Gridview”, I showed how to create a Gridview script that would allow you to select files by type and delete them. In this post I will show how to add a popup window that will allow you to confirm your choice to delete. In that post I placed a series of files of different types in my C:\temp folder and then used Out-GridView with the -passthrough option to select certain files and delete them.

But what if you are like me and too quick to click buttons and accidentally do stuff you didn’t want to do? That’s where a confirmation popup comes in handy and I use them a lot in my code. Here is the code from the previous post:

$FILEPATH = “C:\TEMP”
Set-Location -Path $FILEPATH
$FILES= Get-childitem $FILEPATH |
SELECT Name, @{Name=”Type”;
Expression={
if($_.name -like ‘.doc’) {“Word Document”} if($_.name -like ‘.txt’) {“Text Document”}
if($_.name -like ‘*.pdf’) {“Adobe Document”}
}
} | Out-GridView -PassThru -Title “Select Files For Deletion”
Foreach ($SELECTION in $FILES)
{
Remove-Item $SELECTION.name
}

The basic rundown of this script is that it uses the Get-childitem commandlet to retrieve the list of files in the c:\temp folder, then uses the Expression command with an IF statement to create a column with file types. Then it uses the -passthrough option of Out-GridView to pass the filenames selected through to a Remove-Item command which deletes the files.
First we will add some code to the beginning of the script:
Add-Type -AssemblyName System.Windows.Forms
This will add the proper .NET Code class to the Powershell session.
Next will add some code between the Out-GridView code and the Remove-Item If statement. This will cause a window with yes/no buttons to popup before deleting the files. The button “answer” is passed to the variable $OUTPUT. If the value of $OUTPUT is “YES” then the code to delete the files (which will be placed inside this IF statement) will execute, otherwise the popup window will close and nothing will happen:

$OUTPUT=[System.Windows.Forms.MessageBox]::Show("Thomas, you are about to delete some important files, are you really, really sure you want to do this? Come on man!!!" , "WARNING!!!" , 4)
if ($OUTPUT -eq "YES" )
{
           Foreach ($SELECTION in $FILES)
          {
                          Remove-Item $SELECTION.name
           }
}

Now when you execute the script, select some files for deletion and click ok, you will get this popup window:

Here is the complete code:

Add-Type -AssemblyName System.Windows.Forms
$FILEPATH = “C:\TEMP”
Set-Location -Path $FILEPATH
$FILES= Get-childitem $FILEPATH |
SELECT Name, @{Name=”Type”;
Expression={
if($_.name -like ‘.doc’) {“Word Document”} if($_.name -like ‘.txt’) {“Text Document”}
if($_.name -like ‘*.pdf’) {“Adobe Document”}
}
} | Out-GridView -PassThru -Title “Select Files For Deletion”
$OUTPUT=[System.Windows.Forms.MessageBox]::Show("Thomas, you are about to delete some important files, are you really, really sure you want to do this? Come on man!!!" , "WARNING!!!" , 4)
if ($OUTPUT -eq "YES" )
{
           Foreach ($SELECTION in $FILES)
          {
                          Remove-Item $SELECTION.name
           }
}

Categories
How To Powershell Tech

Customize the output of Powershell Gridview.

Powershell – Customizing Gridview

The Powershell Out-GridView commandlet is a very useful visual aid for Powershell coders to get output into a graphical window for quickly viewing and sorting data retrieved from Powershell commands. It’s out-of-the-box functionality is somewhat limited however, so in this post I will show how to customize some of the output to make it more useful.

The Out-GridView command simply takes output from a Powershell command and pipes it to a spreadsheet-like window. For instance if you type the command:

Get-process | Out-GridView

You will get something like this:

Lets start by updating the Title of the Gridview window. We do this with the Title option: Get-process | Out-GridView -Title “My Computer’s Processes” Now the Title looks a little more professional:

Next let’s change the column names to be more useful. Some people may not know what NPM(K) means. We can change the column names by using the SELECT Statement similar to SQL along with the Expression command. The SELECT Statement tells Powershell which columns of data you want to present to Gridview. For instance let’s say you only want to see the ProcessName and CPU cycles. You would use this command:
Get-process | SELECT ProcessName,CPU | Out-GridView
Then you would get the following:

If you want to change the name of one or more columns you would use the SELECT command along with the Expressions command. For instance maybe you want to change “ProcessName” to just “Process” and “NPM(k)” to “Non-Paged Memory”. You would do so in the following way using the SELECT command along with expression:

Get-Process | SELECT @{Name="Process";Expression={$_.ProcessName}}, @{Name="Non Paged Memory"; Expression={$_.NPM}} | Out-GridView

This gives you a much cleaner looking Gridview:

Next we’ll add some rounding to the CPU column to clean up the numbers, we probably don’t need to know the numbers down to the 1/100,000.

This image has an empty alt attribute; its file name is image.png

We do this by adding the [MATH::ROUND] Command along with a number telling Powershell how many decimals to round to. In our case we will use “0” to round to the nearest whole number:
@{Name=”CPU”; Expression={[math]::round( $_.CPU , 0 )}}
Our output now looks like this:

But if we’re troubleshooting a performance issue we may want to sort by memory or CPU. You can do this in Gridview by simply clicking the column headers, however you can also do it in the script. You must sort the data however, before it is presented to the Gridview. You do this by piping the data to the Sort-Object command:
Sort-object CPU -Descending
Here’s the entire line of code we’ve built so far:

Get-Process | SELECT @{Name="Process";Expression={$_.ProcessName}}, @{Name="Non Paged Memory"; Expression={$_.NPM}}, @{Name="CPU"; Expression={[math]::round( $_.CPU,0 )}} | Sort-object CPU -Descending | Out-GridView -Title "My Computer's Processes"

Now let’s say you want to do something useful with the data in the Gridview. You can select rows in the grid and pass the data through to another command using the passthrough command. You must assign the output of the Get command to a variable and then use the passthrough option of Out-GridView like so:
$SELECTION = Get-Process | Out-GridView -passthrough
This allows you to highlight one or multiple rows using your mouse and the CTRL key and once you click ok on your Gridview window, Powershell will pass the data in your selection to the variable you assigned where it can be parsed and used in the next command in your script.

Let’s start fresh with a new example so we can use the -passthrough option and also highlight some other things you can do with the Gridview window. We will build on what we learned so far.

In this example, I have a set of files of different types in a folder. I’m going to use the Get-childitem command to get a list of those files and then add a new column with custom data in it for sorting the file types. Here is a look at the files in the folder:

If we assign the file path to a variable and then do a Get-childitem using that variable and output to Gridview we will get something like this:

$FILEPATH = "C:\TEMP"
Set-Location -Path $FILEPATH
Get-childitem $FILEPATH | Out-GridView

I went ahead and added another line of code Set-Location -Path $FILEPATH. This will set the working directory of the script to the folder we are interested in. You’ll see why later.

We’ll use the knowledge we gained earlier in this post and cleanup the column names using our Expression command from earlier add a window title and put the columns in a more comfortable order:

$FILEPATH = "C:\TEMP"
Set-Location -Path $FILEPATH
Get-childitem $FILEPATH | Select @{Name="File Name";Expression={$_.Name}}, @{Name="Last Write Time";Expression={$_.LastWriteTime}}| Out-GridView -Title "Working Files"

This will give you a window like this:

It looks good, but what if you wanted to sort by file type. File type is not an available data field returned by the Get-childitem command. What we can do is extend our Expression command to use an if statement and create a new column which contains the file type.

$FILEPATH = "C:\TEMP"
Set-Location -Path $FILEPATH
$FILES= Get-childitem $FILEPATH |
SELECT Name, @{Name="Type";
Expression={
if($_.name -like '*.doc') {"Word Document"} 
if($_.name -like '*.txt') {"Text Document"}
if($_.name -like '*.pdf') {"Adobe Document"}
}
} | Out-GridView -title "Working Files"

That’s all fine and dandy, but what if want to do something useful with the files returned, like deleting them? That’s where the passthrough command comes in. We will add the rest of the code to pass the information selected through to a variable and use the foreach command along with the remove-item command to delete the files selected. We’ll also update the title to something more appropriate. Here is the complete code:

$FILEPATH = "C:\TEMP"
Set-Location -Path $FILEPATH
$FILES= Get-childitem $FILEPATH |
SELECT Name, @{Name="Type";
Expression={
if($_.name -like '.doc') {"Word Document"} if($_.name -like '.txt') {"Text Document"}
if($_.name -like '*.pdf') {"Adobe Document"}
}
} | Out-GridView -PassThru -Title "Select Files For Deletion"
Foreach ($SELECTION in $FILES)
{
Remove-Item $SELECTION.name
}

Now when you highlight the files and click ok, they will be deleted:

I clicked Ok and ran the script again and as you can see the files are gone:

In a later post I will explain how to put an “Are You Sure” button in your delete command.

Categories
Citrix How To Tech

CITRIX-ADC(Netscaler) Customizing the Portal Page

I was asked once by the marketing department at the company I worked for to customize the Citrix ADC login page. They were trying to standardize their branding across all areas of the company. I found some of the customizations to be fairly easy, others were not. This is a sample of the changes I made. There are many more you can do. I removed the company logo and the file names for security reasons:

To Setup a Custom Portal Theme in Citrix ADC (Netscaler)

Before creating a custom theme, if a Global Theme has been established, you must unbind the ADC(Netscaler) Gateway Global Settings first:
Go to Gateway>Global Settings>Client Experience Tab. Scroll down to UI Theme and set to Default then you can set the custom portal themes for each Virtual Server.

Creating a New Theme:
1:  Log into ADC Primary Node  and go to Citrix Gateway > Portal Themes
2:  On the Portal Themes Page click Add:

3: Give the new Portal Theme a name and select a Template:

4: On the Look and Feel Section are majority of settings you can adjust. I highlighted the ones that correspond to my portal image above. Click the edit button to change any of the settings:

5: Click OK when finished.
6: Once the Theme has been created, it needs to be bound to Citrix Gateway Virtual Server. Go to Citrix Gateway > Virtual Servers select the Virtual Server and click Edit:

7: Scroll down to Portal Theme and click the Edit button: (If there currently no theme established, Portal Theme will not show up. You will have to click Portal Themes on the right-hand side of the page under Advanced Settings)

8: Drop down to select the Portal Theme you created and click OK:

Important Note: Before you perform an upgrade of Citrix ADC (Netscaler) unbind any custom themes first, perform the upgrade and rebind your themes. Upgrades will usually crash on custom themes.

To update the browser tab icon:

Log into the each Citrix ADC Command Line Interface in your cluster or use an SSH tool such as WinSCP and replace the /netscaler/ns_gui/vpn/images/AccessGateway.ico file with a new image file with the identical name.